
Interior Photography Tips: Lighting, Composition, Lenses & Perspective
Interior photography rewards preparation and technique more than almost any other discipline. A small change in camera position shifts a room from feeling cramped to feeling spacious. A different approach to lighting balance turns a dark, uninviting space into somewhere that looks genuinely appealing. A few minutes of staging before the camera is even set [...]
July 5, 2026 • gradepixel
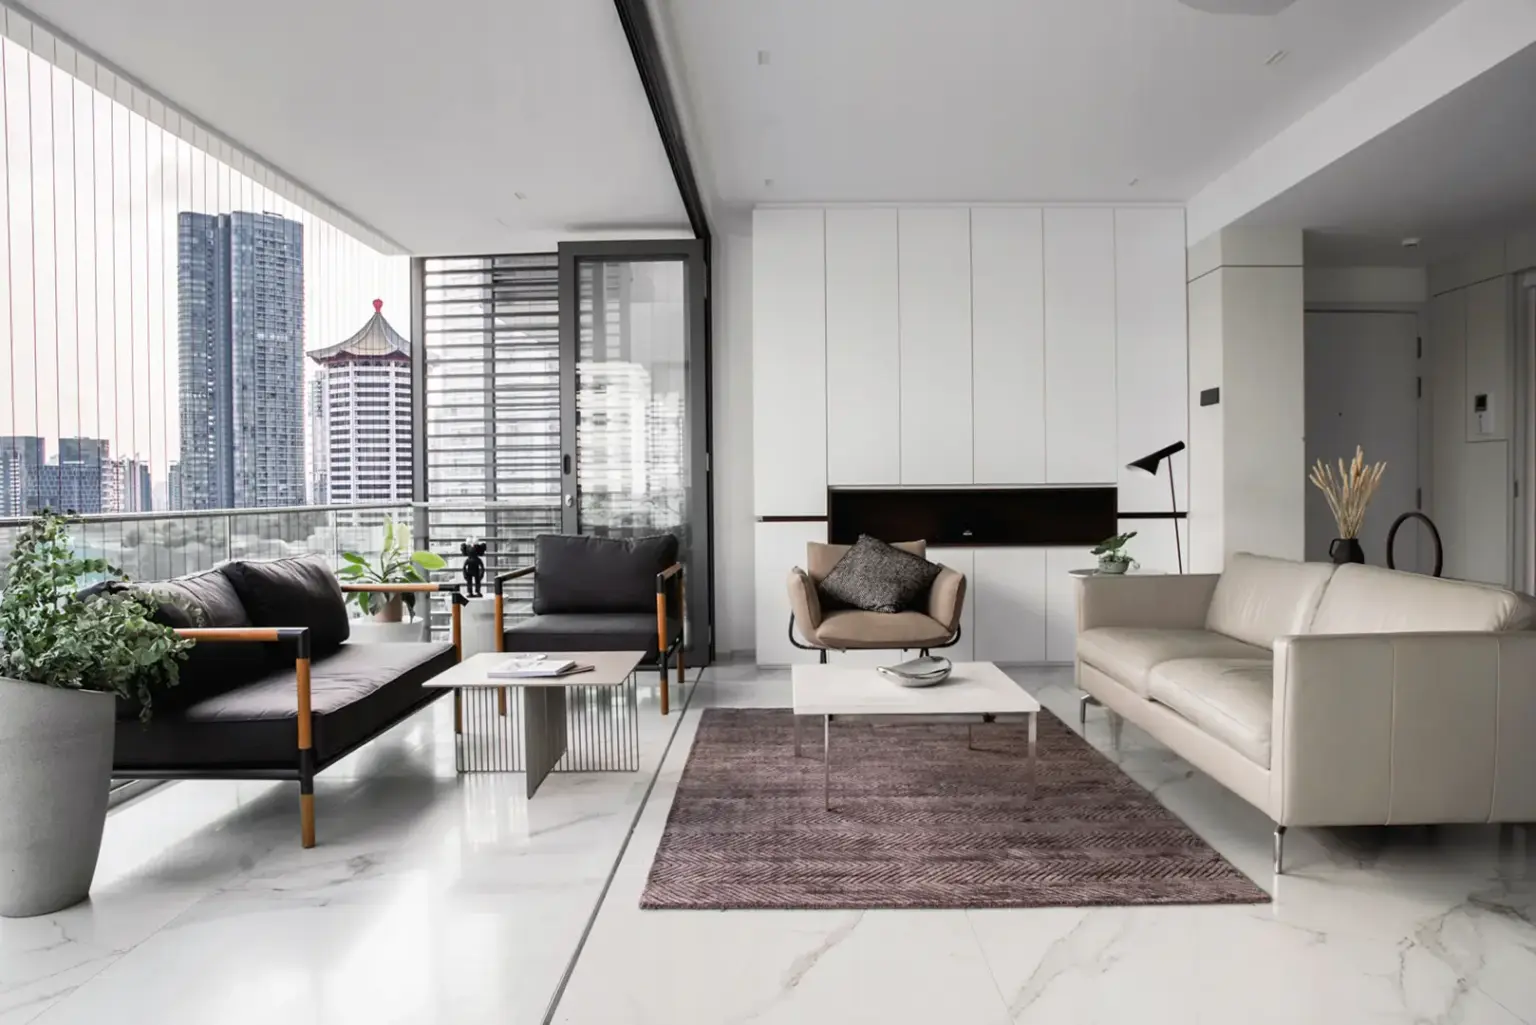
Interior photography rewards preparation and technique more than almost any other discipline. A small change in camera position shifts a room from feeling cramped to feeling spacious. A different approach to lighting balance turns a dark, uninviting space into somewhere that looks genuinely appealing. A few minutes of staging before the camera is even set up can make the difference between images that make a listing perform and images that hold it back.
This guide covers the practical foundations — lens choice, perspective control, lighting, composition, staging, and post-production — that separate professional interior photography from a well-intentioned phone shot.
Tip 1: Choose the Right Lens
The lens is the single most consequential gear decision in interior photography — more so than the camera body.
Wide-angle lenses in the 14–24mm range (on a full-frame camera) are the standard for interior work. They capture enough of a room to show its layout and proportions clearly, which a standard 35mm or 50mm lens simply cannot do in most residential rooms.
Avoid going too wide. Below around 14mm, perspective distortion becomes noticeable in a way that makes spaces look unrealistic — walls curve at the edges, proportions become elongated, and viewers (even without consciously identifying the issue) sense that something looks off. The goal is wide enough to show the room clearly, not as wide as physically possible.
Lens quality matters more than maximum aperture. Interior photography is almost always shot on a tripod at small apertures (f/8 to f/11) where depth of field covers the full room — so maximum aperture is irrelevant. Corner sharpness and minimal distortion are what matter. A sharp, low-distortion wide-angle prime lens will consistently outperform a budget zoom at the same focal length.
Tilt-shift lenses are used by some interior photographers for in-camera perspective correction — they allow the front element of the lens to shift vertically, keeping verticals straight without any post-processing. They’re expensive and require a different shooting technique, but for photographers doing significant volumes of interior work, they can streamline the workflow meaningfully.
Tip 2: Master Two-Point Perspective
Two-point perspective is the compositional standard in professional interior photography — and the most reliable way to make a space look clean, orderly, and well-proportioned.
In a two-point perspective image, vertical lines — walls, door frames, window frames — remain perfectly vertical in the photograph, while horizontal lines (where the wall meets the ceiling or floor) converge toward two vanishing points off to the sides of the frame. The result is a composed, architectural look that feels deliberate and precise.
The key to achieving this:
Keep the camera perfectly level. Both left-right tilt and front-back tilt affect perspective. Most modern cameras have an electronic level, and tripods with ball heads can be adjusted until the bubble sits in the centre. A camera that’s even slightly tilted forward or backward will introduce converging verticals.
Shoot from the right height. Camera height affects how the proportions of a room feel. Too low and the floor dominates; too high and the ceiling dominates. For most rooms, a camera height between 100cm and 140cm produces natural-looking proportions.
Use perspective correction in post-production. Even with a level camera, some convergence is often present — particularly with very wide lenses or in taller rooms. Lightroom’s Transform tools, Photoshop’s Perspective Warp, or dedicated software like PTLens allow for precise correction after the fact.
Tip 3: Handle Lighting With Care
Lighting is where interior photography gets technically complex — and where the difference between professional and amateur results is often most visible.
The Window Exposure Challenge
Interior spaces almost always have a significant brightness difference between windows and the rest of the room. A single exposure forced to choose between the two typically produces either a correctly exposed interior with blown-out white rectangles where the windows are, or a correctly exposed window view with a dark, underexposed room.
HDR and exposure blending addresses this directly. The approach: shoot multiple exposures of the same frame — at least one exposed for the interior, one exposed for the window — and blend them in post-production so both the interior and the window are correctly exposed in the final image. Done carefully, this produces a natural-looking result that matches how a human eye perceives a room more closely than any single exposure can.
Managing Multiple Light Sources
Most interior spaces combine natural daylight (which tends toward a cooler, bluer tone) with interior artificial lighting (which tends toward warmer orange or yellow tones, depending on the bulbs). Mixing these without management creates colour casts — areas of the image that look unnaturally orange, yellow, or blue.
Practical approaches:
- Turn off interior lights and rely on natural light from windows where possible — simpler to manage, particularly during daytime shoots in well-lit spaces
- Turn on interior lights and set white balance manually to balance the mix — requires careful calibration and often some post-production colour correction
- Use supplementary photography lighting (a portable LED panel or strobe) to add controllable, colour-accurate fill light in darker areas of the room
In Singapore’s climate context: Singapore’s consistent daylight (close to the equator, daylight hours are relatively uniform) is generally an advantage for interior photography timing — there’s less seasonal variation to contend with than in more northern latitudes. Early morning and mid-morning light through east-facing windows, and afternoon light through west-facing windows, tend to be the most practical shooting windows for well-lit interiors.
Tip 4: Composition — How to Frame a Room
Shoot from corners where possible. Positioning the camera in or near the corner of a room shows two walls, gives context for the room’s shape and proportions, and creates depth through the converging lines of the walls and ceiling. A shot taken flat against one wall, looking directly at the opposite wall, tends to flatten the space.
Include foreground elements for depth. A piece of furniture, the edge of a sofa, or part of a kitchen counter in the immediate foreground of a shot creates visual layering — making the image feel three-dimensional rather than flat.
Use leading lines deliberately. Hallways, kitchen counters, the edge of a ceiling beam, and the joint between floor and wall are all lines that can be used to lead the viewer’s eye through the frame toward the key subject of the image.
Leave room above and below. Cutting off the ceiling or floor too tightly makes spaces feel compressed. Leave enough of both to establish the room’s proportions and volume.
Vary your framing between wide shots and tighter shots. Wide shots establish context and layout; tighter shots show details and quality. A complete room coverage typically needs both — relying only on wide shots leaves viewers without a clear sense of material quality or craftsmanship; relying only on tight shots leaves them without a sense of the overall space.
Tip 5: Staging Before You Shoot
Staging — preparing the space before the camera appears — has a larger impact on the final images than most non-photographers expect. The photographer controls the light and the framing; the staging controls what’s in the frame.
Declutter surfaces and floors. Every visible cable, every item left on a counter, every object on the floor is visible in a wide-angle interior shot. Remove what doesn’t belong in the frame before the session starts, not in post-production afterward.
Open curtains and blinds completely. Natural light from windows is generally flattering for interior photography. Half-open blinds create awkward striped shadows; fully open windows and blinds (or fully closed, with interior lighting as the primary source) are cleaner to work with.
Turn on all interior lights. Lamps, overhead lights, and any accent lighting should be on during the shoot, even in a well-lit room — they add warmth and prevent the space from looking “dead” in darker corners.
Straighten everything. Cushions, rugs, chairs, and decorative items that are slightly off-centre or misaligned are immediately visible in wide shots. A few minutes of straightening before the first frame produces images that look composed rather than careless.
Remove personal items for real estate shoots. For real estate listings in particular, visible personal items — family photos, personal collections, clothing — make it harder for prospective buyers and tenants to imagine themselves in the space.
Tip 6: Post-Production Essentials
Perspective correction first. Before colour or exposure adjustments, correct any remaining perspective issues — converging verticals, lens distortion, and crop to the intended framing. Starting with a geometrically correct frame makes all subsequent adjustments more accurate.
Exposure blending for window balance. If you’ve shot multiple exposures, blend them now — bringing in the window view from the darker exposure into the correctly lit interior image.
Colour correction with care. Interior photography should look like a real, well-lit room — not like a heavily processed HDR image with saturated colours and dramatic contrast. The goal is a clean, natural result that makes the space look its best while remaining accurate.
Avoid over-processing. The most common mistake in DIY real estate and interior photography post-production is going too far — images that are too bright, too saturated, or have the telltale halo effect of aggressive HDR processing. These look obviously processed to any experienced eye and can undermine the credibility of what’s supposed to be an accurate representation of the space.
When to Hire a Professional
Interior photography produces noticeably better results when the shooter has both the right equipment and significant experience — and the learning curve for consistent, professional-quality results is steep. For listing photography where the quality of images directly affects property enquiry rates, or for hospitality and design portfolio photography where the stakes of poor imagery are high, professional photography is generally the right investment.
→ For guidance on how to choose a professional interior photographer in Singapore, see our article on choosing an interior photographer in Singapore.
→ To discuss your interior photography requirements, visit our interior photography studio in Singapore.
Frequently Asked Questions
What is the best lens for interior photography?
A wide-angle prime lens in the 14–24mm range on a full-frame camera is the standard for interior photography, with 16mm or 17mm being particularly common. The most important characteristics are corner sharpness and minimal distortion — maximum aperture matters very little since interior photography is almost always shot on a tripod at f/8 to f/11. For phone photography, use the ultrawide lens mode if available, but be aware that phone ultrawide lenses introduce more distortion than dedicated wide-angle camera lenses.
What camera settings work best for interior photography?
For most interior work, aperture f/8 to f/11 (for front-to-back sharpness throughout the room), ISO as low as possible (ISO 100 or 200) to minimise digital noise, and whatever shutter speed is needed to achieve the correct exposure at those settings — since the camera is on a tripod, a slow shutter speed of several seconds is perfectly fine. Shoot in RAW format to maximise the flexibility available in post-production, particularly for exposure blending.
How do I keep walls looking straight in interior photos?
The two key steps are keeping the camera level during the shoot — using the camera’s built-in electronic level and a tripod — and correcting any remaining convergence in post-production using lens correction and perspective transformation tools. Lightroom’s Transform panel (particularly the Vertical slider) handles most cases well; more complex corrections may need Photoshop’s Perspective Warp tool.
GradePixel is an interior photography studio in Singapore. We produce photography for real estate, hospitality, and interior design clients. Contact us to discuss your project.
A title
Image Box text
Sylvester Lim - Founder of GradePixel
I’m Sylvester, founder of GradePixel, a commercial photography and video production studio in Singapore with over 10 years of experience. I’ve worked with brands across product, food, fashion, and corporate sectors, helping businesses create clean, effective visuals that drive real results. My focus is always on practical, high-quality production that works for marketing.